
-UNDER CONSTRUCTION-
LOCKS
Locks require you to follow other paths and view other pieces of the story in order to unlock them. You can spot them in the flow chart as black squares with a closed book with a question mark. You can “jump” to any stage you’ve completed just before the question marks through the flow chart in the menu. Once unlocked, they will turn into a green square with an open book. These paths should be played first.
 Lock 1: See Clover ending. Yellow > Betray > Green > Ally (Achievement: To Each According to His Needle)
Lock 2: Solve the Laboratory puzzle once. Yellow > Ally > Red (Achievement: If I Told You You Had a Nice Antibody…)
Lock 3: See Sigma’s ending. Four step solution. Must first see the endings for Dio, Alice, and Tenmyouji once to get to Sigma’s. (Achievement: Gotta Hand it to You)
a) Magenta > Betray > Red > Betray > Dio
b) Cyan > Ally > Blue > Betray > Alice
c) Yellow > Ally > Blue > Ally > Tenmyouji
d) Cyan > Betray > Green > Ally >Sigma
Lock 4: Solve the Laboratory puzzle once. Yellow > Ally > Red
Lock 5: See Dio’s ending once. Magenta > Betray > Red > Betray (Achievement: He Was Convicted of a String of Numbers)
Lock 6: Watch the failure sequence when you first reach it, then go back to it. Yellow > Ally > Red
Lock 7: See Alice’s end. Must reach locks 5 and 6 first. Two step solution.
Magenta > Betray > Red > Betray
Yellow > Ally > Red
Lock 8: See Phi’s Game Over. Cyan > Betray > Red > Betray
Lock 9: See Alice’s end and reach locks 5 and 6. Two step solution.
Magenta > Betray > Red > Betray
Yellow > Ally > Red (Achievement: Who Set Us Up? The Bomb, Part A)
Lock 10: See Luna’s end. Have ID and Password for two-headed lion login. (Achievement: Some Days You Just Can’t Get Rid of a Bomb)
ENDINGS
Magenta (Lounge) > Ally > Blue (Rec Room) > Betray (right) > Lock 1 > K End (Achievement: Through the Looking Glass)
Magenta > Ally > Blue > Ally (left) > K Game Over
Magenta > Ally > Green (Gaulem Bay) > Betray > Luna Game Over 1
Magenta > Ally > Green > Ally > Director’s Office (ID: GTF-DM-L-016, PW: MILKEVOLI) > Ally > Luna End (Achievement: Tears in the Rain)
Magenta > Ally > Green > Ally > Director’s Office (ID: GTF-DM-L-016, PW: MILKEVOLI) > Betray > Luna Game Over 2
Magenta > Betray > Red (Pantry) > Ally > Dio Game Over
Magenta > Betray > Red > Betray > Bomb 0 code > Dio End (Achievement: Behind Blue Eyes)
Yellow (Infirmary) > Ally > Blue (Pressure Exchange Chamber) > Ally > Lock 2 (Achievement: I can’t believe it’s not murder) > White (Director’s Office) > Ally > Tenmyouji End (Achievement: In Root Beer Veritas)
Yellow > Ally > Blue > Ally > Lock 2 > White > Betray >Tenmyouji Game Over 2
Yellow > Ally > Blue > Betray > Tenmyouji Game Over 1
Yellow > Ally > Red (Laboratory) > Ally > Lock 3 (Achievement: Gotta Hand it to You) > Quark End (Achievement: An Equal and Opposite Reaction)
Yellow > Ally > Red > Betray > Quark Game Over
Yellow > Betray > Green > Betray > Clover Game Over
Yellow > Betray > Green > Ally > Clover End (Achievement: Secret Agent Woman)
Cyan > Ally > Blue > Betray > Alice End (Achievement: Best Served Cold)
Cyan > Ally > Blue > Ally > Alice Game Over
Cyan > Betray > Green > No > Ally > Lock 6 > Search Crew Quarters (Achievement: No Lying on the Job) > Ally (Achievement: Who Set Up Us The Bomb, Part 1) > Sigma End (Achievement: Arms Race)
Cyan > Betray > Green > No > Ally > Lock 6 > Search Crew Quarters > Betray > Sigma Game Over
Cyan > Betray > Red > Betray > Phi Game Over
Cyan > Betray > Red > Yes > Ally > Lock 8 (Achievement: Why’d You do That, You Dumas!) > Lock 9 > Bomb 3 (LXQ LHC NMR) > Bomb 2 (EQD DYR NTK) > Bomb 1 (BQZ RGJ DXR) > Lock 10 (Achievement: Some Days You Just Can’t Get Rid of a Bomb) > Bomb 0 (LXA QNS GDQ) > Q > One-headed lion ID: KURASHIKI, PW: JUMPYDOLL > New location in chart (top) >AB Room Past > New location in chart (bottom) > Phi End (Achievement: Time After Time)
New location in chart (top) > End or Beginning (Achievement: Fire and Ice)
New location in chart (bottom) > Another Time end (Achievement: A Certain Point of View)
Notes:
Rock, paper, scissors events make no difference in outcome.
A choice between actions at a certain point, starting with A. Scratch Head, B. Cross Arms and more, doesn’t matter.
Director’s Office two-headed lion puzzle requires ID: GTF-DM-L-016 from Luna in Sigma ending and Password: MILKEVOLI from K ending to progress.
One-headed lion login info: ID: KURASHIKI, PW: JUMPYDOLL.
Decryption password, Alice’s Ending: when given the key, each number on the key corresponds to a letter on the scrambled message. Don’t close the message before deciphering. The password is COMPLETED.
For how to get past the Locks, scroll back up to the beginning of the page to see the paths for each solution.
ROOM PUZZLES
Elevator
Remove pin from fire extinguisher. Remove poster from wall, inspect it in your inventory. Count number of babies (4) and number of old people (7). Press 4 on the side with the baby sign, and 7 on the sign with the old person. Remove colored handles from bars on each side of elevator (red, green, blue, yellow). Use pin in fire extinguisher box. Remove screw tips. In your inventory, combine the triangular tip with the yellow handle, hexagonal tip with red handle, pentagonal tip with green handle and the square tip with the blue handle.
Look at the elevator vent below the number panel to the right of the door. Use the four wrenches on the respective colored screws. Take the puzzle box. Solution: Right, Up, Right, Down, Left, Down, Left, Up, Right, Down, Right, Up, Right, Up, Right. Receive green memory card.
On the number panel next to the door, use the rabbit’s name as a clue: press 0 to get a blue memory card, press 3 to get a red memory card.
Insert red card on the machine to get blue safe password. Open safe with this password to get the bonus file.
Insert blue and green cards on the machine to get green safe password. Open safe with this password to get the key. Use key on elevator number panel and press the button.
Lounge
Pick up the left sofa cushion to reveal a magazine. Take magazine and examine it. Pan down below the sofa and take the globe piece. From the shelves behind the sofa take another piece of the globe and bartender’s journal. Inspect the table with the broken globe and take the globe disc and globe piece. Look at the bar counter and take the “sticks” from the glass on the right. Take all three empty glasses. Look at the shelf behind the counter and take all the drink bottles: red, white, blue, green, yellow, sun, island, moon, planet, ocean. Take the globe piece.
Put the globe together: combine both south hemisphere pieces, both north hemisphere pieces, then combine one of them with the disc and add the remaining piece. Put it on its stand on the table.
Examine the wall clock. Use the clock hands to set it at the time stated on the magazine, 4:50. No numbers here, so set the hands to green and sun. Look at the globe again and note the writing in black: blue planet, red moon.
Head over to the mixer on the side of the counter. To make a drink, place two bottles on top and empty glass at the bottom. Mix red+moon, green+sun and blue+planet. Place them on the coasters on the counter: red moon on the left, green sun in the middle, blue planet on the right. Get the blue password from the screen.
Go back to the mixer and dump all three drinks. From the bartender’s journal you can learn the three drinks ordered, and that by exclusion of impossible combinations, the son was lying. Mix white+island, red+planet, blue+ocean. Check the journal for the order of the drinks, but note that the bartender was facing opposite from you. Place red planet on the left, white island in the middle, blue ocean on the right. Check the green password on the screen, take your items and use the key on the lock by the door to leave.
Infirmary
Text
Crew Quarters
Enter Room 1. Examine the book and the bed.
Enter Room 2. Examine the bed. Take the metal piece from the desk.
Enter Room 4. Examine the bed. Take the object from the desk. Combine it with the metal piece. Use the key to open Room 3.
Enter Room 3. Examine the bed. Take the box cutter from the desk. Open the locker and take the aluminum foil. Use the box cutter with the foil four times. Look at the desk and use foil pattern 3. Find the word “LOCKER”.
Enter Room 1. Use the foil shapes on the desk. Find the shapes circle, star, diamond, triangle.
Enter Room 2. Use foil pattern 1 on the desk. Find code 4985. Turn to face the locker and enter 3+1, 6+3, 6+2, 3+2. Get the tape.
Enter Room 3. Use the tape on the phone.
Enter Room 4. Use foil pattern 2 on the desk. Find code 3492. Turn to face the locker and enter 0+3, 3+1, 6+1, 0+2. Examine the wallet and take the coin. Face the poster and use the coin to scratch it. Note the numbers and shapes: circle = 1, star = 6, diamond = 8, triangle = 9.
Enter Room 1. Use the phone. On the top row, press 2 to connect to Alice and get half of a code: 25**. Use the phone again, press 4 on the top row to speak to Phi to get another half of a code: **92. Dial 2592 to hear a message. Get code 2652. Dial 2652 and take the metal pin when the lid opens. Turn to the locker and use the pin to activate the puzzle. Since two of the shapes on the bikini girl poster were upside down, you have to invert the numbers, so the 6 becomes a 9 and vice-versa. The code becomes 1986. Enter 0+1, 6+3, 6+2, 3+3. Take the green password.
Use the phone and dial 1986 to get a mirrored code: 9861. Open the locker with 6+3, 6+2, 3+3, 0+1 and take the blue password. Open the safe with the blue password first for the file, then the green to leave.
Rec Room
Text
Pantry
Text
Security Room
Text
Laboratory
Text
Treatment Center
Text
Pressure Exchange Chamber
Take the elevator up. Note the numbers below the panels with the arrows. Upstairs, open the lockers and take the protective suit. Look at the bench to the left of the safe. Take the binder, read the file and notice the symbols on the bench. Go downstairs to the pressure chamber door. Click it to activate a puzzle. Connect the colors as stated in the PEC Outside file.
Red: Right, Down, Bottom Right, Bottom Right, Orange
Yellow: Right, Down, Right, Bottom Right, Right, Green
White: Up, Bottom Right, Down, Down, Bottom Right, Black
 Inside the chamber, take the tablet on the bench and notice the numbers on it. Each corresponds to a shape from the upstairs bench. Look at the bunny. Look at the console near the bunny. Try pressing a button. Take the key from it (bottom right). Check the door opposite from where you came into the chamber. Clover will leave and go upstairs.
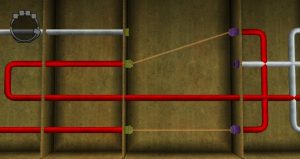
Turn towards the bunny, use the key on it. Pick up the small bunny. Turn to the console and press the red button. Click the wall with the cables and metal panels. Pick up the yellow and purple connectors (2 of each). Connect the bottom yellow to bottom purple, and the second to top yellow on the left to the top purple on the right (see image) to power up the console. Press the red button again.

Click the glass window to speak with Clover. Click near the floor under the machine with the clock and dials and she will find a file. Open the chamber door by connecting the colors as stated in the PEC Inside file.
White: Up, Top Right, Up, Right, Purple
Yellow: Down, Down, Right, Up, Right, Top Left, Top Right, Left, Red
Blue: Top Right, Top, Top, Top Right, Right, Top Right, Down, Right, Green
Garden
Text
Archives
Text
Control Room
Text
Director’s Office
Look at the computer on the desk. Look around the room and find the bookshelf under a red stripe on the wall. Take the cheap brandy bottle, the table next to it, and all three sets of books from underneath. On the opposite side of the room, take the globe from the top of the cabinet and examine it in your inventory to get a file. Open the sliding door to the right to get a bottle of expensive brandy. Note the red paint marks that appear around the room in different places.

Director’s Room safe
Approach the large door with a white glowing circle. The file from the globe shows the color combinations to connect. See image on the left to see how to connect them. Instructions:
Green: Up, Right, Top Right, Down, Red
White: Down, Left, Bottom Left, Up, Blue
Purple: Right, Top Left, Top Right, Left, Left, Left, Left, Up, Top Left, Right, Yellow
Open the safe and take the binder and mounted deer head.

Back to the desk, interact with the business card holder for the next puzzle. You need to arrange the names so the back forms a message: Book 334. Go back to the bookshelf and place the book sets in order: historical (3), philosophy (3), literature (4).
On the same shelf, place the expensive brandy on the green plate above the books and note the red H shape.
Zoom out and click the red stripe on the wall above the bookshelf. Mount the deer head on the holes and note the red E shape. Go back to the cabinet and place the cheap brandy on the green plate to see a shape appear. Inspect the suit of armor, and take the slingshot and short spear from its hands. Use the short spear on the desk drawer to receive a key. Use the key on the facial recognition console to the left of the desk, and a secret wall will turn to reveal a chair. Take the helmet and place it on the suit or armor. Notice the red L letter.
Click the chair to sit on it and see what’s on the other side of the balloon. Use the slingshot on it. Now you can see the letters from the right angle: H E L (indeed, puzzle hell!). Sit back up and pull the lever to the left of the chair. Note the letter P and pick up the battery on the table to the left of it. Pull the lever again to get out of this perspective. Combine the battery and tablet in your inventory, and insert HELP as the password. Obtain green safe password.

Examine the screen on the cabinet with the safe on top, it’s now glowing cyan. The goal is to rearrange the pieces to make a parallelogram, as in the image that appeared on the brandy bottle. You can move (cross icon) and rotate (circular arrow) the pieces by alternating the controls on the bottom left button. Form the shape as you see on the right here to receive another password. Use IILP as the password on the tablet to get the blue safe password.
Open the safe with the blue password first to get the file, then the green password so you can leave.
Q Room
While facing the door, examine the face of the cube in front of you to see something like Mine Sweeper (see below). Zoom out of the cube and notice the wall is 5 squares high. Click the 4 leftmost squares on the wall, according to the FRONT image below, where the circled numbers are. The squares on the wall will change into a light green color. A vertical panel slides out of the wall.

Zoom in on the cube and rotate your perspective to view the left side. Click the wall squares according to the circled numbers as shown in the LEFT grid. Three panels will appear.
Zoom in on the cube to examine the RIGHT side and note the numbers. Click the two wall squares on the first column, bottom left, and then three on the right, that you can see through a gap on the panel that slid out first. Two more panels will appear.
Rotate your perspective to examine the BACK of the cube (you should be facing a door and a console that shows red and yellow darts). Click the corresponding squares on the wall.

Cube room walls with all consoles revealed.
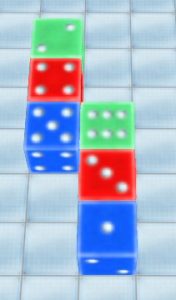 Examine the four books on the shelf to get pictures of red, blue and green dice added to your files. Put together, they give you the puzzle solution. Zoom in on the dice table to move the dice into their respective positions. Roll them in the following order:
Blue 6 die: Left, Down, Down, Down, Left (obtain blue 1)
Red 6: Right, Down, Down, Down, Down (obtain red 3)
Green 1: Down, Right, Right, Right, Down (obtain green 6)
Blue 2: Down, Right, Up, Right, Up, Up, Right (obtain blue 5)
Red 5: Right, Right, Down, Left, Left (obtain red 4)
Green 3: Down, Down, Right, Up, Up, Up, Up, Up, Up, Right, Down (obtain green 2)
Collect the blue memory card from the top right side of the puzzle board.

Pan right to the darts console. Click the darts to get three. Zoom out and click the panel on the right (with the red, green and blue color labels) to reach the dart board. Score 100 with 3 darts, using one dart per color: 13×3 (green), 14×2 (blue), 11×3 (red). Collect the green memory card from the display next to where the darts were.
Turn to the hexagon and triangles. You need to change everything to red, so click the top row middle green hexagon, the two center row red hexagons, and the two bottom row red triangles (see image). The panels on the right open. Zoom in on them to pick up a binder and the red memory card.
Facing the dice puzzle and books, look to the left below the book shelf. Zoom in on the screen and use the memory cards in the slots to start the AB game simulation.
Blue password solution:
Round 1: US vs. D > A vs. C > B vs. E > Betray
Round 2: US vs. C > A vs. E > B vs. D > Ally
Round 3: US vs. C > A vs. E > B vs. D > Ally
To get the green password repeat this solution for all three rounds: US vs. C > A vs. E >B vs. D > Ally. Open the safe, get the key and go.
ACHIEVEMENTS
Character Endings
Saw Clover’s (Yatsuba) ending in VLR
Saw Alice’s ending in VLR
Saw Dio’s ending in VLR
Saw K’s ending in VLR
Saw Phi’s ending in VLR
Saw Luna’s ending in VLR
Saw Sigma’s ending in VLR
Saw Quark’s ending in VLR
Saw Tenmyuji’s ending in VLR
Saw any of the bad endings
Saw the end. Or maybe the beginning?
Finish any of the endings in VLR
A certain point of view
Locks
Open the 1st lock
Open the 2nd lock
Open the 3rd lock
Open the 4th lock
Open the 5th lock
Open the 6th lock
Open the 7th lock
Open the 8th lock
Open the 9th lock
Open the 10th lock
Completion
Escape on HARD in VLR
Escape everything on HARD in VLR
Escape from 8 rooms in VLR
Escape from 16 rooms in VLR
Gained all Secrets in VLR
Find all Files in VLR