CHAPTER 5: THE GARDEN OF EARTHLY DELIGHTS
Contents
CHAPTER 5: THE GARDEN OF EARTHLY DELIGHTS
Victoria is “awakened” by Miller, who says that the prints match Kolar’s. Time to go back to the Campus.
THE CAMPUS
Go upstairs, Miller is standing by Kolar’s apartment door. Talk to him. Victoria ends up kicking the door in with the excuse that she heard some noises. Look around the apartment and then exit to meet Mia, Kolar’s neighbor. After a long chat with her you find that she saw him at her working place. Miller goes ahead to check it out. Once the conversation is done, Officer Tate arrives to guard the door and you can head to the car and check out the new location: the Red Lantern.
THE RED LANTERN
Miller tells you that his efforts didn’t work and that he couldn’t go inside. Victoria has an idea. Take her inside, and when you get out the elevator, talk to the bouncer. He won’t let you in unless you bring a pass, so it’s off to the Campus to talk to Mia again.
THE CAMPUS
Go inside, up the stairs and past Officer Tate to the end of the hallway. Click on the last door. Mia has to take a phone call downstairs, so when she leaves, investigate the bedroom. Look at the silver half apple. Click on the photo album on the bed. Click on the bottom left picture to take it. This is the same person that was on the picture found in the morgue.
When Mia comes back, Victoria asks about the person in the picture. Mia says her name is Stephanie and that she forgot to meet her and gives you the address. Victoria rushes out of the room. Walk downstairs, get in the car and go to the new location: Richard’s Gallery.
RICHARD’S GALLERY
Go through the front door. Talk to Richard at the front desk and ask him to see the artists’ studios. Follow him to arrive at the studio a bit too late and find the 6th victim. Mia walks in a little later to leave screaming. Richard leaves to call the Police and to find Mia.
Take the elevator down and inspect the purse. Grab the club pass. Check to see what’s stuck under the elevator. Walk over to Stephanie’s dead body and take the picture that’s on her chest. Now walk to the door where Mia entered from and pull the chain. Pick it up. Go back to the elevator and take it upstairs. Now on the pathway use the chain on the hook above you. Victoria slides down, and can now grab whatever was stuck under the elevator: a silver rose.
The investigating team arrives and Todd will tell you to meet Miller at the office and interrogate Kolar.
Leave through the half-open door, walk to the upper right corner of the scene into the alleyway and keep going right to find yourself outside the gallery again. Go inside, behind Richard’s desk, and move your cursor around until you can catch the computer to zoom in on the desk. Click on it and grab the picture of Victoria that’s next to it. Leave and head to the office.
THE OFFICE
Take the elevator to the 8th floor. Walk to the end of the hallway and enter the interrogation room on the right. After a few pointless questions, Todd walks in and lets the suspect go. Miller starts arguing with him and that’s Victoria’s queue to leave.
Go into the office, to Claire’s desk. Use the club pass on the paper cutter. Now use Victoria’s picture on the paper cutter. Move over to the spot where the print lifting tools are. In the inventory, combine Victoria’s picture with the pass. Use the fake pass on the plastifying machine, and you have your own Red Lantern pass. Go down to the garage and use the navcom to get to the Red Lantern.
THE RED LANTERN
Once upstairs, use the pass on the bouncer to get in. Inspect the closed door. It has a riddle on it: “In my memoirs you shall find the instrument of my suffering with which we celebrate our vows”. Walk to the doorway on the right, and in the next room, go right again.
Inspect the painting on the wall: it’s called “Reminder” and it has the numbers 4 and 2. Leave this room and on the next screen take the top doorway.
Inspect the weapons on the wall, you find the numbers 3 and 6. Inspect the masks on the wall. Take the silver mask and the nail that it was hanging from. Lastly, inspect the painting: it’s called “Dark Wedding” and it has the numbers 1 and 5.
Go back to the door with the riddle. Enter the numbers in this order: 4, 2, 3, 6, 1, 5. You are now in the statue room. Leave them as they are for now.

At the center of the room there is a bowl of fruit, with half of a silver apple. Pick it up. Now you will need the other half that you saw in Mia’s apartment, which means you need the keys to get in first. Go back to the car and go to Richard’s Gallery.
RICHARD’S GALLERY
Walk inside and talk to Mia. She will give Victoria her keys. Go back outside and head to the Campus.
THE CAMPUS
Go upstairs to Mia’s apartment. Use the keys on the door. Walk into the bedroom and grab the other half of the silver apple. Open your inventory and combine both pieces.
Check the photo album again and take the written reminder for the statue puzzle. It reads:
“Let us be behind a veil, left to our secret designs. Then present me with the object of your desire and I will show you the meaning of temptation. Be ready, because our passion will flow like blood that runs through your veins and at the end you will be ready to welcome the blissful pain that will open to you, a new world.”
Go back to the Red Lantern.
THE RED LANTERN
Walk into the statue room. Using the note from Mia’s album, you will have to place the appropriate object on each statue, in the right order.
Statue puzzle solution:
- “I am the Queen of Secrets. Give me what I desire the most.” – Place the mask on the statue’s face.
- “I am Lady Temptation. Give me what I desire the most.” – Place the silver apple on the snake’s mouth.
- “I am the Baroness of Blood. Give me what I desire the most.” – Place the silver rose in the statue’s mouth.
- “I am the Mistress of Pain. Give me what I desire the most.” – Place the nail on the statue’s hand.
A secret passage will open to reveal a spiral staircase.
In the new area, walk into the room closest to the staircase. On the fireplace, grab the key and the puzzle piece. Go back to the previous room and take the door to the right, into another very kinky bedroom.
Click on the fireplace, it’s time for a sliding puzzle.
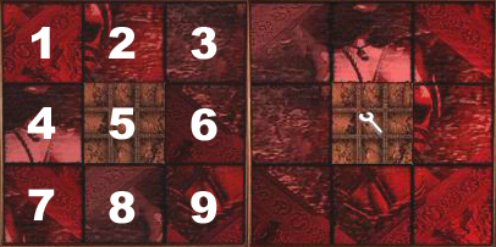
Sliding puzzle solution:
Click the pieces in the following order: 6, 3, 2, 1, 4, 7, 8, 5, 2, 3, 6, 5, 4, 7, 8, 9, 6, 5, 2, 3, 6, 5, 2, 1, 4, 5.
When you’re done, you will have the image on the right. Use the final piece (which is in your inventory) on the middle square. The safe will open, grab the key handle that’s inside.
Go back to the room near the staircase. In your inventory, combine both pieces of the key. Use the key on the fireplace. Go through the fireplace. Inspect the book. You will see some familiar names on the guest list: Mark Ackerman and Todd Browning. Now you know why Todd dismissed Kolav from the interrogation.