CHAPTER 7: DEATH DO US PART
Contents
CHAPTER 7: DEATH DO US PART
Richard is giving Victoria a tour of the Ackerman exhibit in the gallery. The paintings seem a lot more than just coincidence. We need to know more about this “artist”, so let’s investigate at the office.
THE OFFICE
In the garage, grab the fire extinguisher that’s on the pillar just before the elevator. You will need it later. Go upstairs to the 8th floor. Victoria will try to hack Claire’s computer to get access to old files but Claire catches her. Talk to her to find out that you need Level 4 access, and the only person who has it is Todd.
You need to get into his office, and for that you need keys. Conveniently, the janitor has the keys, but you need to make him leave the room.
Go down the hallway to the coffee machine. Grab a napkin from the dispenser. Use the napkin on the coffee machine. Turn the coffee machine on, and you’ll spill coffee everywhere.
Go back to the office and tell the janitor that you’ve made a mess. Once he’s out of the room, grab the keys and screwdriver from his cart.
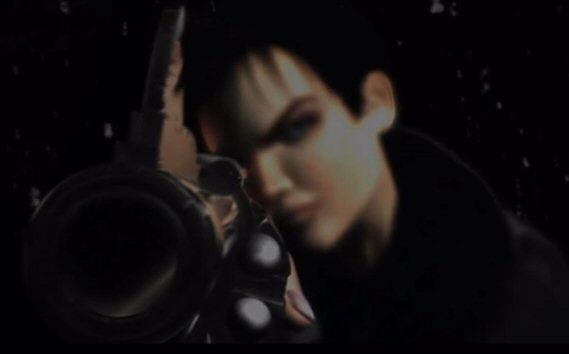
Use the keys on Todd’s office door. Inside, grab the taser from the cabinet on the left. Click on Todd’s desk. Click on his computer. A scene shows Victoria trying to access the files about Ackerman, with no luck. She has to go to the central archive room. Leave the desk. Click on the safe on the right wall. It has a fingerprint scanner, so you need Todd’s prints. Click on the desk again and grab the coffee mug.
Go back outside and click on Claire’s working station, on the far left side. Open the round powder box, grab the brush, use it on the powder and then use it on the mug. Rotate the mug until you see a full print. Click on the lifting tape and use it on the print.
Go back to Todd’s office and use the fingerprint on the safe. Get the access key that’s inside, leave his office and take the elevator. In the elevator, use the access key on the button panel. Click on the B3 button.
THE ARCHIVES
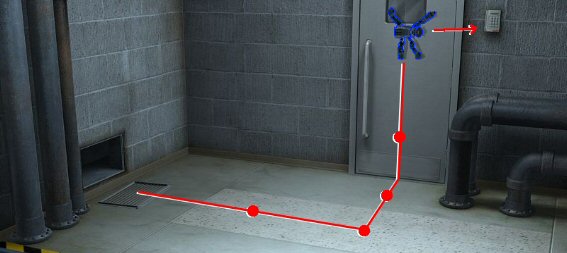
Approach the first door to your right. Click on the magnetic lock on the wall near the door. Use the screwdriver on it. Use the taser on it. Go into the room. Near the next door, there’s an air duct panel. Click on it and then use the screwdriver on each screw to remove it.
Now walk over to the computer console. Press the release button. Press the remote button. You are now controlling the little robot in the next room. You goal is to fry the circuits for the door lock so you can go in.
Move the robot forward twice, turn to face the door. Move the robot forward three times and turn facing the lock.
Walk Victoria out of the control room and into the room where the robot was in. Use the fire extinguisher to reveal all the lasers. Go back to the control panel for the robot. Press release, then remote.
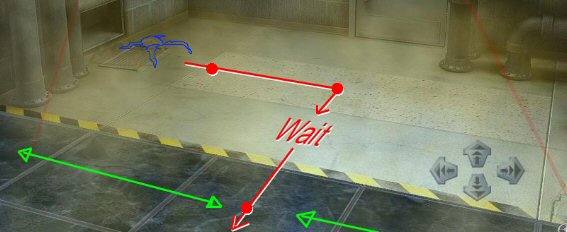
You need to navigate the little robot all the way across the room to reach the next control panel, which will deactivate the lasers. Use the images as reference and practice turning and moving around quickly before you begin. You can’t save during the robot’s course, so if a laser touches the robot, you need to restart.
The red lines are the robot’s path; the green lines show the laser movements. Wait on the spots marked and study the next laser movement. You will need to move quickly and time them right.
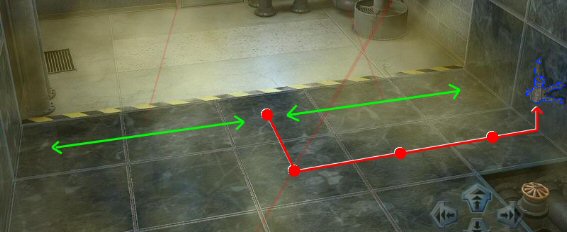
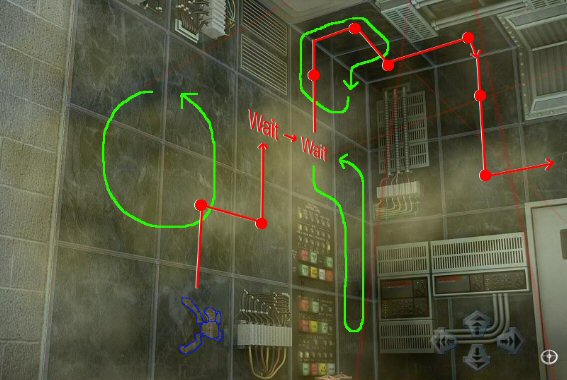
When the robot reaches the next panel, it will zap the circuits and the lasers will be deactivated. You can now bring Victoria inside and through the next door, into the actual archives room.
Click on the desk. Victoria will activate the computer and search for the Ackerman files, but they have all been deleted. It seems that they’ve been missing since the 1930’s (but were there even computers then?) and that her grandfather has deleted them. Maybe he kept them somewhere. Let’s take Victoria back to Pat’s house.
When you get up to leave, Todd enters and a big argument begins. Victoria quits her job at the FBI and threatens to go public with the names on the Red Lantern’s list, but that doesn’t mean she’ll drop the case. Go to the garage and head to Pat’s house.
PAT’S HOUSE
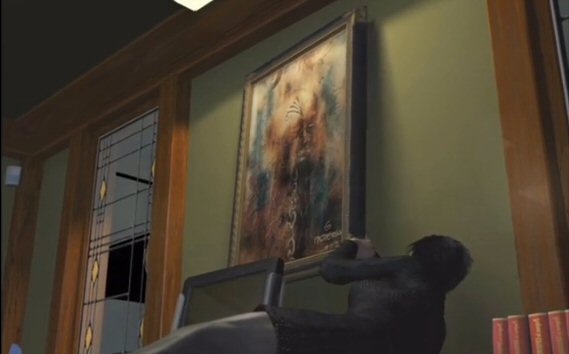 Go upstairs, all the way down the hallway, into the study. Inspect the painting on the wall. Examine the back of the painting. Go back downstairs and enter the jacuzzi room, to the right of the kitchen. Grab the exacto knife from the toolbox. Go back upstairs and use the knife on the back of the painting.
You will see a scene explaining what happened to Gus and Milena after Ida’s murder. It also explains what became of Mark Ackerman, who was admitted to a mental institution. So if Mark is out of the picture, who is committing these crimes?
The phone rings, and it’s Richard telling Victoria that he doesn’t know where Mia is. Get in the car and head to the Campus.
THE CAMPUS
Go upstairs to Mia’s apartment. Another cinematic launches, with Victoria struggling with the killer in the apartment. When Victoria wakes up, look for Mia’s purse and take her gun. Get in the car and go to Richard’s Gallery.
RICHARD’S GALLERY
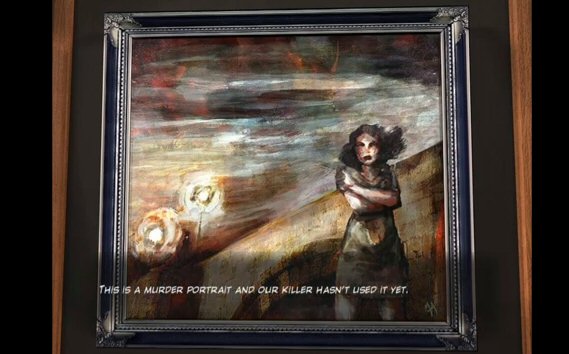
The purpose is to inspect the paintings for clues. Walk around and find the painting of the woman in front of the bridge. Make sure you click on the bridge, and take note that words appear on the top right of the screen.
Go back to the entrance and click on the front desk. Use the computer to do a search and enter the three words: Prague, Chicago and Bridge (if you inspected the painting correctly, they will be on a list on the right column in the computer screen). Read the article that the search brings up.
There’s a new location on the map, so go outside and get in the car. Click on the new location on the far right of the navcom: Tominova Bridge.
TOMINOVA BRIDGE
Watch the ending scene. Wait for the credits to roll, since there’s another short scene after that.