
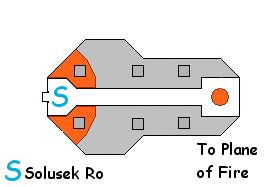
Tower of Solusek Ro
Contents
Tower of Solusek Ro
One of my favorite zones in this expansion, the Tower was a fun place to go late at night with limited numbers, usually 3 or 4 full groups of level 65 players.
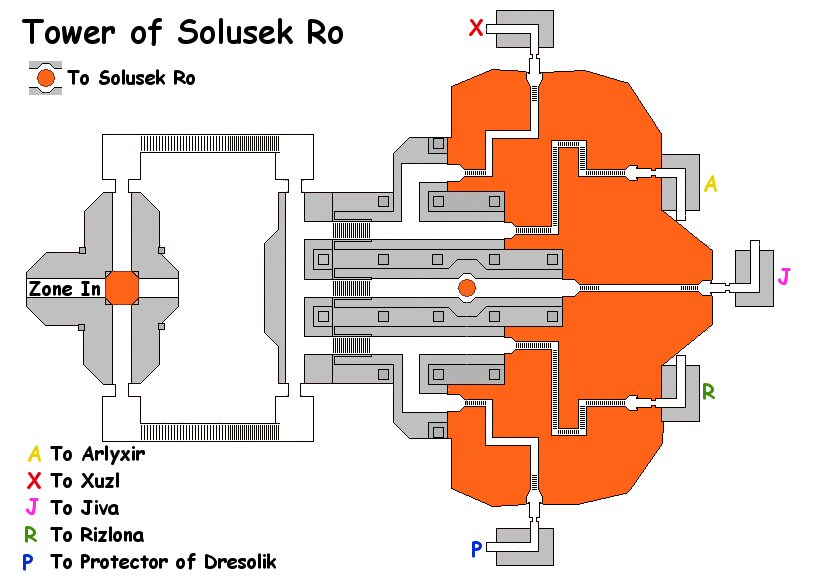
You can take on three of the mini-bosses with no problem as long as the key classes are there. Besides, the mini-bosses are a good way to get some Ornate Armor patterns especially chest pieces.
However, Jiva requires a few more enchanters to control the adds comfortably and the Protector is surely an insane encounter on such light numbers.
Always make sure you have pulled everything out of his room except the mini-boss prior to engaging.
RIZLONA
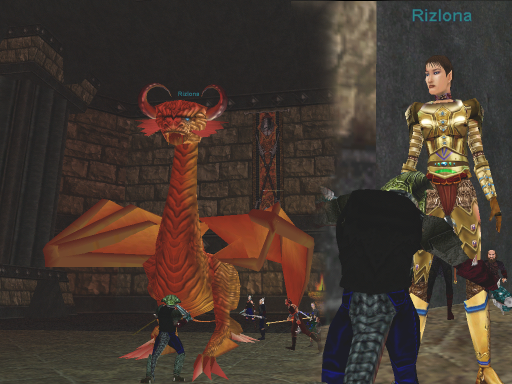 Rizlona is a two-in-one fight. You need to kill her half-elf form (which isn’t a problem at all) but when you do kill her, she morphs into a dragon.
The Dragon Rizlona casts Flame Song of Ro (850 dmg point blank AE, fire based) and Lava Breath (500 dmg and Cancel Magic, 200 range targeted AE, fire based).
Be prepared with an instant click item (Grim Aura earrings, for instance) and place the effect on your first buff slot. Use the item as soon as the dragon dispells or you’ll find yourself buffless in no time.
Rizlona’s known loot table is as follows:
Basalt Plated Pauldrons (PAL RNG SHD BRD BST)
AC: 20, STR: +12, DEX: +10, STA: +15, WIS: +9, INT: +9, HP: +115, MANA: +100, SV COLD: +20, SV MAGIC: +20
Effect: Speed of Mithaniel (25% spell haste, beneficial spells only, Complete Healing and Percentage Heal excluded)
Flame Encased Earring (ALL)
AC: 5, DEX: +12, WIS: +12, INT: +12, AGI: +12, HP: +90, MANA: +90, SV COLD: +18, SV MAGIC: +12
Effect: Focus of Solusek (Decrease mana cost by 10%, detrimental only)
Mithril Shod Staff (MNK BST)
2H Blunt, Atk Delay: 20, DMG: 33, Magic DMG: 1, STR: +12, DEX: +15, WIS: +12, HP: +125, MANA: +100, SV COLD: +25
Sun Flare Ear Bob (ALL)
AC: 5, AGI: +12, DEX: +12, WIS: +12, INT: +12, HP: +75, MANA: +75, SV COLD: +18, SV MAGIC: +12
Effect: Focus of Solusek (Decrease mana cost by 10%, detrimental only)
Rizlona also drops a book entitled “The Time Grows Near”, which reads the following:
Jiva the Reckless rests now that his work is done.
With the knowledge afforded to him by wise Arlyxir he was able to create a tear in the planes between the Tower of Solusek Ro and The Plane of Fire. Arlyxir has always been trusted go-between for Solusek and his father Fennin. However, Arlyxir has decided to form alliance with Solusek.
The decision of direct confrontation against the populace of Norrath was not an easy one to make. They both know that Fennin would not agree to such a hostile act, because the Pantheon would not condone it.
After many hours of incantations a great well marked with runes of fame appeared and began to pour the very essence of the Plane of Fire into The Tower. The Guardians of Dresolik, the Great Shard, watch over the pulsating crystal has it harnesses the power being syphoned from the Plane the Fire. Only time stands between us now. Those that I once walked with will soon learn of the mistakes in their transgressions.
I can hear Xuzl in his Tower, always working on his conjurings. The crackle of the animated regiment of flaming swords can be deafening. Xuzl does not take any time to rest; for he knows as will all do that the time draws near.
Greater fiends have been constructed by Solusek to spread their curse upon any that survive the initial destructive force from Dresolik. The seven fiends will be generals of the army being conjured by Xuzl. Solusek has also placed his trust in two elemetals. These elementals have coalesced into the form of wyverns. I must say that I am quite partial to their new forms, and have formed a kinship with them. Together with them we will exterminate any dragonkind that are resistant enough to flame to save them from onslaught that Dresolik will provide. Dresolik pulses with extreme power, it will soon be powerful enough to scorch Norrath. I can only hope that my voice and praise of Solusek will be enough to give the others the strengh needed to continue.
XUZL
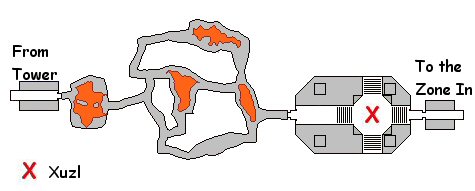 Getting to Xzul is a lot more difficult than fighting him. On your way through the caves, you will encounter animated flaming swords (conjured automatons) which hit hard and fast. You will have to be ready to deal with two at the same time (since they are too close to each other and can’t be split), twice. They quad for over 1100 but are fully slowable, That doesn’t mean the cleric heals can slack, since 5000 damage in a few seconds can have drastic consequences if people aren’t paying attention. If you can deal with the swords, Xuzl won’t be a problem.
Hitting for 1000dmg isn’t a big deal when you can fully slow Xuzl. Basically, just keep going in a circle around the platform, since other things will spawn outside of it. It’s a pretty clean fight after slow lands.
Xuzl’s known loot table is as follows:
Circular Shield of the Blaze (CLR DRU SHM)
AC: 40, STR: +10, DEX: +12, STA: +5, WIS: +12, HP: +100, MANA: +100, SV DISEASE: +5, SV COLD: +25, SV MAGIC: +5, SV POISON: +5
Effect: Haste of Solusek (15% spell haste, detrimental spells only)
Collar of Corrupted Flame (WAR PAL RNG SHD MNK BRD ROG BST)
AC: 12, DEX: +20, STA: +15, WIS: +10, INT: +10, HP: +100, MANA: +100, SV MAGIC: +20
Effect: Aura of Battle (+2HP per tick, +10 ATK)
Lance of the Flame Knight (PAL SHD)
2H Piercing, Atk Delay: 39, DMG: 50, Fire DMG: 5, STR: +12, STA: +10, WIS: +15, INT: +15, HP: +125, MANA: +125, SV COLD: +25, SV MAGIC: +20
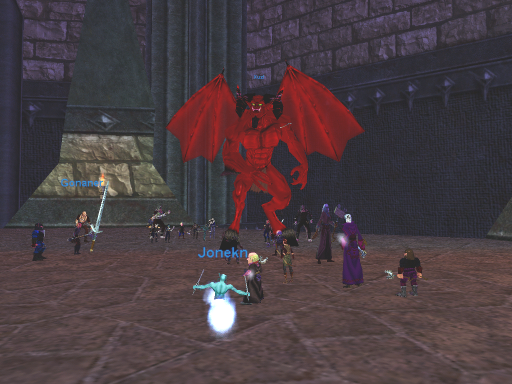
JIVA
 The first thing you should know about Jiva is that the fastest you kill him, the less adds you will get. But if you want to increase your chances of looting Ornate Armor patterns, then you definitely want the adds to spawn. Just make sure you have a good raid force (5 full groups at least) to deal with all of them.
Start by casting an Elixir on the main tank just before rushing to the platform. The melee force will stand on the platform while casters and healers will be down and around it. A standard Complete Heal rotation applies, as well as backup healing to deal with the AE damage. Group and/or MGB heals are a good way to go.
Jiva casts Reckless Mutterings (500 dmg, decrease Attack by 50, point blank AE, 200 range, fire based) frequently, which is very annoying.
The adds will spawn around the platform, where enchanters will be ready to mezz them. If you have necros, have them feed the healers and enchanters with mana as they need. And they will need it.
 Jiva’s known loot table is as follows:
Black Basalt Band (WAR PAL RNG SHD MNK BRD ROG BST)
AC: 10, STR: +12, DEX: +12, STA: +12, AGI: +12, HP: +115, SV FIRE: +15, SV MAGIC: +15 Effect: Vengeance III (+15 ATK)
Jagged Shard of Frozen Flame (WAR RNG BRD ROG)
1H Slashing, Atk Delay: 20, DMG: 17, STR: +15, STA: +10, AGI: +15, HP: +125, MANA: +100, SV FIRE: +7, SV DISEASE: +7, SV COLD: +20, SV MAGIC: +7, SV POISON: +7
Effect: Ember Strike (150 dmg proc)
Ornate Broadsword (PAL)
1H Slashing, Atk Delay: 20, DMG: 26, Fire DMG: 1, Bane DMG: Undead +1, DEX: +12, STA: +10, WIS: +18, AGI: +12, HP: +125, MANA: +100, SV DISEASE: +8, SV COLD: +20, SV MAGIC: +8
Effect: Celestial Remedy (regens 54 to 65 HP per tick)
Rune Etched Bamboo Bo (MNK BST)
2H Blunt, Atk Delay: 28, DMG: 42, AC: 15, STR: +20, STA: +20, WIS: +15, HP: +140, MANA: +140, SV COLD: +25, SV MAGIC: +15
Effect: Claw of Khati Sha (150 dmg proc)
PROTECTOR OF DRESOLIK
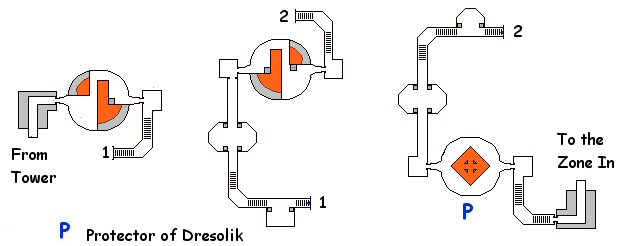
In order to get to Protector, you have to kill the six named guardians that stand on the way to his room. These guardians all look like Xuzl, they’re level 68, they rampage, they hit for about 1100 and single-target charm. They also cast Curse of the Fiend, which is an unresistable point blank AE that does 50 dmg per tick, 9 counter curse and increases fizzle rate (though if you have Spell Casting Mastery at level 3 you won’t really notice the difference). It can be cured with Greater Remove Curse.
In case your main tank gets charmed, mezz him and have someone else gain aggro ASAP.
All of these guardians (Balrezu, Naelizar, Veleroth, Quazlith, Instadis, Grezou) have a common drop.
Protector of Dresolik’s know loot table is as follows:
Basalt Greatsword of the Protector (WAR PAL RNG SHD)
AC: +40 Dex: +15 Sta: +15 Wis: +15 Int: +15 Cold Resist: +35 HP: +145 Mana: +145
2H Slashing, DMG: 45, Delay: 35, DMG Bonus: 38, Effect: Boiling Blood (24 to 37 dmg per tick)
Gleaming Obsidian Shard (WAR RNG BRD ROG BST)
AC: +10, Dex: +15, Wis: +10, Int: +10, Agi: +15, Disease Resist: +5, Cold Resist: +15, Poison Resist: +5, HP: +100, Mana: +75
Primary and Secondary Slots, Piercing, DMG: 16, Delay: 20, DMG Bonus: 13, Effect: Obsitian Shatter (30dmg, -6 AC)
Mithril Battle Hammer (SHM DRU CLR)
Dex: +8, Sta: +10, Cha: +10, Wis: +15, Agi: +8, Cold Resist: +25, Poison Resist: +10, HP: +100, Mana: +125
Primary and Secondary, 1H Blunt, DMG: 21, Delay: 24, DMG Bonus: 13, Effect: Firestrike (282 to 302 dmg)
Sphere of Encased Flame (NEC WIZ MAG ENC)
AC: +12, Dex: +15, Cha: +10, Int: +20, Agi: +15, Cold Resist: +20, Magic Resist: +10, HP: +100, Mana: +100
Range Slot, Effect: Wave of Health (75hp group heal)
Wand of the Firestorm (NEC WIZ MAG ENC)
Dex: +12, Sta: +12, Int: +18, Cold Resist: +25, HP: +100, Mana: +125
Primary and Secondary Slots, Effect: Vengeance of Time (25% Spell Damage increase)
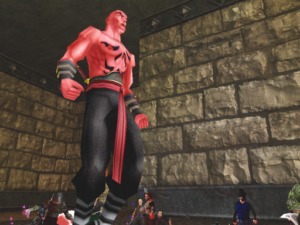
SOLUSEK RO, THE BURNING PRINCE
 Once everyone has all 5 of the mini-bosses pre-flags, make your way to the large pillar of fire coming out of the pot with strange runes. One of these runes is the portal to Solusek Ro’s chamber, and it’s easy to tell which one it is since it looks different from all the others and has a small square around it.
Everyone should be in their assigned groups, fully buffed and standing by for the call of the “sacrificial paladin”. Not always sacrificed, the paladin will be the first to port up while invulnerable, move the first two guards to one side and at this point (about 3 or 4 seconds later) everyone else will port up and kill the guards.
Two main tanks with 2 small cleric rotations will be the best way to take care of them fast. After that, it is easy to single pull each guard as long as the puller sticks close to the walls. Keep in mind that after you kill the last guard you should be ready to take down Solusek Ro, or you might get caught in respawn.
Groups should be slightly changed for Solusek Ro; there will a group of clerics only. One of the clerics will be in charge of healing the rest of the group with a Group Complete Heal after each AE. In between, this cleric can also resurrect some of the fallen between group heals, as long as he/she is equipped with an epic. After the first and second group heals, this cleric can’t sit down and will cast Divine Aura to go down on hate list. Sitting right after the first group heal means instant death.
A correct positioning for this healing strategy would be:
Solusek Ro – – – main tank – – – clerics in rotation – – – cleric healing clerics
This way, the cleric in charge of healing the others will be able to avoid the AE completely. Needless to say, Extended Range items are a must.
Casters and healers will use the first charge of their Mod Rods early in the fight. Bards will be positioned one at the clerics and another with the main tank.
 Solusek Ro casts Solar Flame (single target 2000dmg, decrease Attack by 20, 24 seconds recast) and Solar Winds (200 range targeted AE, 3 waves of 1000 dmg, 48 seconds recast). Some prefer to have the entire raid force in AE range and use MGB heals instead, but that depends mostly on the number of healers available.
Solusek Ro’s known loot table is as follows:
Baroque Half Mask of Solusek Ro (WAR PAL RNG SHD MNK BRD ROG BST)
AC: +20, Dex: +20, Sta: +10, Wis: +8, Int: +8, Cold Resist: +25, Magic Resist: +20, HP: +135, Mana: +115
Effect: Aura of Bravery (Regeneration 3hp per tick, +30 Attack)
Gauntlets of the Burning Prince (CLR DRU SHM NEC WIZ MAG ENC)
AC: +18, Sta: +12, Cha: +10, Wis: +18, Int: +18, Agi: +15, Cold Resist: +30, Poison Resist: +10, HP: +100, Mana: +125
Effect: Speed of Solusek (18% Spell Haste)
Gold Runed Mithril Knife (WAR PAL RNG SHD BRD ROG BST)
AC: +15, Str: +18, Dex: +18, Sta: +10, Disease Resist: +5, Cold Resist: +25, Magic Resist: +5, Poison Resist: +5, HP: +135
Effect: Wrath of Fire (22 to150dmg)
Primary and Secondary, Piercing, DMG: 16, Delay: 19, DMG Bonus: 13, Fire DMG: 1
Raiment of the Fire Son (CLR DRU SHM)
AC: +18, Sta: +12, Cha: +12, Wis: +18, Agi: +15, Cold Resist: +25, Magic Resist: +10 HP: +130, Mana: +130
Back Slot, Effect: Marr’s Gift (25% Healing increase except Complete Healing)
The Orb of the Sun (ALL)
AC: +15, Dex: +12, Sta: +12, Cha: +12, Wis: +15, Int: +15, Cold Resist: +25, Magic Resist: +15, HP: +125, Mana: +135
Range Slot, Effect: Fury of E’Ci (30% Spell Damage increase)