Plane of Nightmare
Contents
Plane of Nightmare
The relevant part of Plane of Nightmare is the Maze Trial which is necessary to access the Lair of Terris Thule. Most commonly known as the Hedge Trial, this task is quite easy when the three groups are balanced. At least one warrior (though I’ve done it with a 65 paladin as tank), one shaman and one enchanter should be included, as well as a pair of clerics.
The purpose is to save Thelin Poxbourne from a never-ending nightmare. You can’t lose sight of him nor let him die and have to follow him around closely, since the maze behind you will change.
At certain dead ends (you will recognize them as large square spaces at the end of hallways) a group of 5 or 6 monsters will spawn at the same time, so always be prepared (ravens are quite annoying when they attack in flocks). Thelin will attack some of them, so you will need to keep him mezzed for a while, kill everything and then use Memory Blur when the fighting is over so you can go on with the trial.
You know you are about to reach the end of the maze once you see a large fountain. Everyone should jump right into the fountain and stay near the middle to avoid gaining aggro from the ravens in the corners. Don’t move from the fountain and wait for the Construct of Nightmares which will be killed at this spot. Two healers are more than enough for this fight, since the Construct hits for 500-1100 but is slowable. He does have a lot of HP though (around 400k), so it will be a bit until you take him down. Once the Construct dies, wait for the rest of the script and the end to this trial. He also drops the shard which is used to obtain the Terris Thule Bane dagger.
Remember to hail Thelin before you leave to get your flag.
A Construct of Nightmares’ known loot table is as follows:
Black Bastardsword (SHD)
AC: +20, STA: +10, INT: +15, SV MAGIC: +20, HP: +75, MANA: +75
2H Slashing, Delay: 38, DMG: 40, DMG Bonus: 40, Effect: Terror of Darkness (Raises you on the target’s hate list by 200 points)
Elbow Spiked Arm Plates (WAR CLR PAL SHD BRD)
AC: +28, DEX: +5, CHA: +5, WIS: +6, INT: +6, AGI: +5, SVDISEASE: +7, SV COLD: +7, SV MAGIC: +7, HP: +40, MANA: +40
Skull Lined Amice (NEC WIZ MAG ENC)
AC: 9, CHA: +5, INT: +8, HP: +45, MANA: +65, SV DISEASE: +10, SV MAGIC: +10
Veteran’s Chain Leggings (RNG ROG SHM)
AC: 19, DEX: +7, STA: +7, WIS: +6, AGI: +5, HP: +45, MANA: +45, SV FIRE: +10, SV COLD: +10
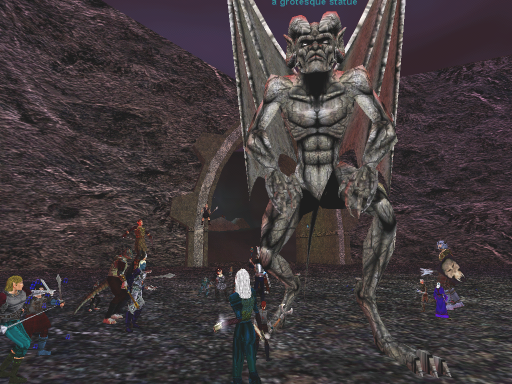
LAIR OF TERRIS THULE
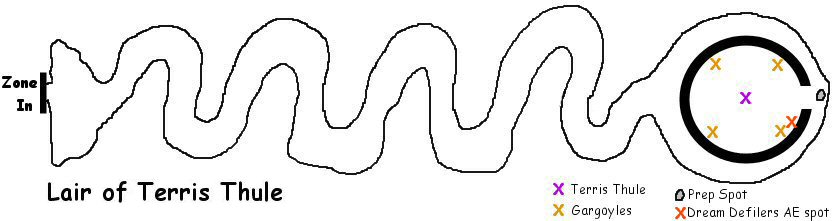
Even though Terris isn’t that hard herself, it’s what happens at certain stages of her health that makes this fight interesting. At 70% of her hitpoints, a small army of dream defilers will spawn, at 50% she will cast Direption of Dreams (200 range point blank AE which dispells you completely) and at 30% the four gargoyles will awake. She has around 150,000 HP, quads for 600 and procs Touch of Night (720 dmg lifetap).
 First of all, gather at the entrance to the lair, on the wall where a rock marks he spot. This will be your preparation spot and dodge-the-AE refuge. Assign who will cast which MGB buffs after the massive dispell.
Clerics who will heal the main tank should be grouped together along with a bard, casters should have secondary healers, secondary tanks (paladins and shadowknights) will be assigned for each gargoyle and each will have their personal healer for when the time comes. Casters will be in charge of the dream defilers, getting rid of them with AE spells.
Everyone should focus on Terris until she is at 75% of her health. At this point, the AE groups will move to the Southeast corner near the gargoyle and get ready for the dream defilers. Dream Defilers cast Sieve (a 50 mana drain) and this wouldn’t be so bad if there weren’t about 20 of them casting it at the same time. Main tank and clerics in the healing rotation stay around Terris while the rest takes care of the “butterflies” as fast as they can.
 As soon as the dream defilers are all terminated, everyone will focus on Terris again until her hitpoints reach the 52% mark. When this happens, any non-essential classes should run out to the preparation spot and save their buffs (main tanks and clerics in rotation are excluded). Once the dispell happens, clerics will speed up heals and cover with faster spells like Supernal Light and Supernal Remedy. A Supernal Elixir timed just before the dispell can prove to be useful and sometimes a lifesaver.
The rest of the “army” will rush back in, MGBs will be cast under Terris (Virtue, Clarity, Focus and Haste at least) while the gargoyle-assigned tanks and respective healers will assume their positions at this point. Everyone else will help take Terris down.
Once she is down to 30%, the gargoyles become targetable and secondary tanks will acquire their targets. Debuffers should be ready to slow and tash them as soon as this happens. Finishing it off is a breeze.
Terris Thule’s known loot table is as follows:
Carved Bone Ring (ALL)
AC: 10, CHA: +20, WIS: +10, INT: +10, AGI: +10, HP: +90, MANA: +90, SV MAGIC: +25
Effect: Mana Preservation IV (Lowers mana cost up to 10%, Complete Healing excluded)
Fearsome Midnight Cloak (WAR PAL RNG SHD MNK BRD ROG BST)
AC: 15, DEX: +10, WIS: +10, INT: +10, AGI: +10, HP: +100, MANA: +75, SV FIRE: +5, SV COLD: +5, SV MAGIC: +20
Effect: Aura of Healing (Regeneration of 2HP per tick)
Indigo Snake Bracelet (NEC WIZ MAG ENC)
AC: 6, DEX: +7, STA: +7, CHA: +7, INT: +12, HP: +85, MANA: +85, SV MAGIC: +15, SV POISON: +15
Effect: Anger of Druzzil (Increases instant and detrimental spells effectiveness up to 23%)
Knucklebone Beaded Veil (CLR DRU SHM)
AC: 12, CHA: +8, WIS: +12, AGI: +8, HP: +100, MANA: +75, SV FIRE: +10, SV MAGIC: +10
Effect: Improved Healing IV (Increases healing by 20%)
Sable Lined Mantle (RNG ROG SHM)
AC: 18, STR: +12, STA: +10, WIS: +8, HP: +75, MANA: +75, SV FIRE: +5, SV DISEASE: +5, SV COLD: +5, SV MAGIC: +5, SV POISON: +20
Effect: Vengeance I (Increases Attack by 5)
TIER TWO
Plane of Storms
BASTION OF THUNDER KEY
Consider Plane of Storms as a passing-through zone. Basically, you only need it to get your access to Bastion of Thunder by means of a quest.
For this quest, you will need to find a Storm Giant Head, any 2 of 3 different Esoteric Medallions, a Storm Satuur Sash, a Storm Taarid Bone and a Storm Volaas Beard.
Storm Giant Heads drop randomly from any giant in the zone, they’re pretty common. Esoteric Medallions are all named the same but they’re identified as Section of the North, Section of the South and Section of the West. The Section of the North medallion drops from Paruek the Strong, Laruken the Rigid and Zertuken the Unweilding (forest giants). The Section of the South medallion drops from Faruek the Bold (ocean giant). The Section of the West medallion drops from Solnebk the Unruly and Pendubk the Turbulent (desert giants).
Storm Satuur Sash is a random drop from forest giants, Storm Taarid Bone is a random drop from desert giants and the Storm Volaas Beard is a random drop from ocean giants.
Once you have all these items, find Askr the Lost in the caves near the zone in, and follow these instructions:
- Hail Askr the Lost.
- When he asks to be left alone, hand him the Storm Giant Head.
- He will ask you who severed the head; say “It was me”. When he asks if you’re paying attention, reply “I am paying attention”.
- He will then talk about how beautiful this plane was, and tell you about the types of giants. Say “Continue” twice.
- You will receive Askr’s Bag of Verity. Place the Bone, Sash and Beard inside and hit combine. Hand Askr’s Sealed Bag of Verity back to him to get a character flag.
- Ask him “What Bastion of Thunder?”
- Receive Askr’s Bag of Verity again. Place the two Esoteric Medallions in the bag and combine to create Esoteric Meld. Give this to Askr and receive a character flag.
- Zone in to Bastion of Thunder through the small shrine in the caves where the tornado is.